


【初心者向け】簡単にセルを取得する3つの方法!【Excel VBA】

こんにちは!『ルウちゃんのExcel Labo』管理人の@rouxchanblogです!
今回はこのような悩みについて解説します。
 ルウちゃん
ルウちゃんセルを取得する方法を詳しく教えて!
この記事でわかるようになること
- セルを取得する基本的な方法
- RangeとCellsの使い方
- 記述する上で注意すること←超重要です
目次
セル番地でセルを取得する方法
セルを取得するには「Rangeプロパティ」を使いましょう!
まずはサンプルコードと実行画面を見て、イメージしてください!
サンプルコード
Range("A1").Value = "セルA1"
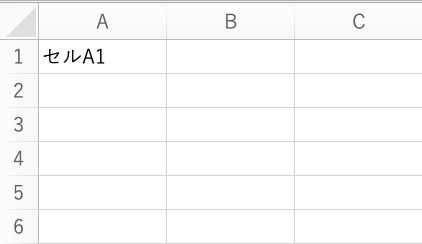
このように「Rangeプロパティ」を使ってコードを書くことで、操作するセル(対象)を指定できます!
引数にはA1形式でセル番地を指定してください!
次にセル範囲を指定してみましょう!
サンプルコード
Range("A3:A5").Value = "セルA3:A5"
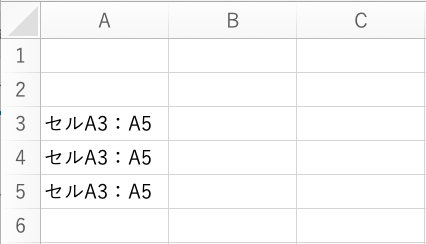
このように引数として2つのセル番地を渡すこともできます。
2つのセル番地を渡すと、2つに囲まれたセル範囲を指定することができるのです。
2つの引数を渡す時は間に「:←コロン」を記入することに注意してくださいね!
セルを範囲で取得する
〜近日公開予定〜
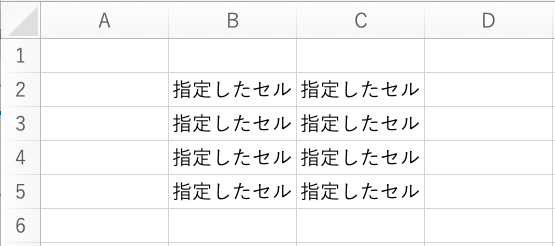
サンプルコード
Range(Range("B2"), Range("C5")).Value = "指定したセル"
行と列番号からセルを取得する
〜近日公開予定〜
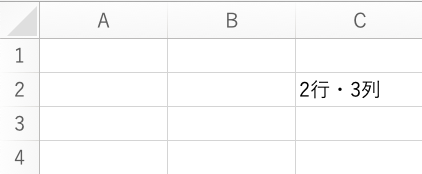
サンプルコード
Cells(2, 3).Value = "2行・3列"
サンプルコード
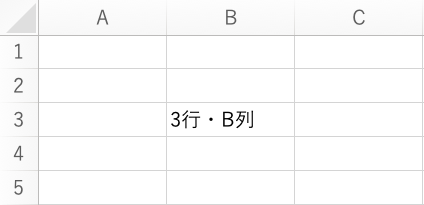
Cells(3, "B").Value = "3行・B列"
まとめ
今回は代表的な3つの方法でセルを取得してきました!
セルの取得はVBAにおいて基本中の基本になるのでぜひマスターしてください!
この記事で少しでも皆さんのお役に立てれば幸いです!
忘れないうちにお気に入り登録もお願いします!
ありがとうございました!
/// お得な情報 ///
すぐに使えて便利なテクニックが650個も手に入る!
気になる人は今すぐクリック!!

コメントはお気軽に!